Using Kudu to Access Azure Website Extensions

There’s a little-known but excellent feature of Azure web apps that makes it easy to access the debugging and development extensions of your Azure website. If you navigate directly to https://your_site.scm.azurewebsites.net/ (replace “your_site” with the real name of your web site) you will find Microsoft’s Kudu service – the engine behind git deployments for Azure web sites.

There’s tons of useful  information you can see using this tool, such as process information, environment variables, server variables and a lot more.

More importantly, it’s also a portal to easily install and access site extensions, such as Visual Studio Online (which you can use to edit files in place on your web site).

For example, to access Visual Studio Online, select the ‘Site Extensions’ menu. There you will find listed all the available site extensions. The first should be VSO. You will need to enable it first, which requires a website restart, but once done, you can access VSO anytime using the following URL format:

https://your_site.scm.azurewebsites.net/dev/

There are a lot more tools available through Kudu, and exhaustive documentation is available on their wiki: https://github.com/projectkudu/kudu/wiki/Azure-Site-Extensions

Kudu is a fantastic tool for development and debugging of your Azure web sites.

For everyday management and monitoring of a web site, the new Azure Portal is a great tool, but to easily access tools and information that are useful to a development team, Kudu is far more powerful.

Visual Studio 2015 Update 1 Highlights

I finally installed Update 1 for Visual Studio, and found a feature that solves my ‘numero uno’ gripe with Visual Studio – having to use ‘Find All References’ to find the implementation for an interface.

The new feature is a menu item called ‘Go To Implementation’ – you can put your cursor into any method exposed via an interface, and instantly go to its implementation without using Ctrl K-R to find all references, and scrolling to the last item in the list.

It’s a real time-saver, especially once you assign a keyboard shortcut.

Of course, Update 1 has tons of other new features, and I’m excited about the new functionality around CPU profiling – knowing more about the internal workings of my code is always a good thing.

There’s a new version of the .NET framework (4.6.1 ), including a whole bunch of new features and bug fixes.

The full release notes can be found here, and for more info on CPU Profiling in VS 2015, go to this blog.

Merry Christmas and Happy Coding!

Duplicating an Azure database with row level security to a new resource group

Introduction

One of the benefits of using Azure resource groups is being able to quickly create identical environments using resource group templates and powershell scripts, so when I was asked to quickly whip up a new test environment, I was prepared, and feeling pretty good about having automated all the things in advance.

Using the template I had created earlier, I had a shiny new environment within a few minutes. Then I thought.. but what about the data?

The Problem

The solution we are developing uses a Sql server row level security policy to provide access restrictions, and one of the drawbacks of this method is that it’s not easy to extract data using traditional data extraction tools, as every login only sees their own data (as it should be). We could have dropped the policy, created a backup (bacpac) file, and then imported to the new empty database. However, this would require a little downtime to prevent users seeing each other’s data, and anyway, that’s not really an elegant solution.

What I wanted to achieve was:

  • Make a copy of an existing database, including all data, users, and schema information.
  • Keep the same SID (security identifiers) on the new server, so that the row level security wasn’t affected.
  • Avoid modifying the original database in any way.
  • Create the new database in a different resource group.
  • Provide a solution that could be automated.

The Solution

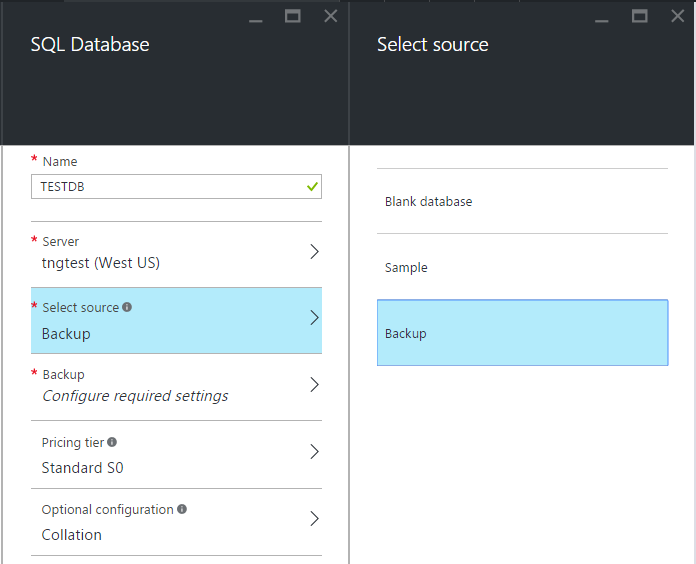
The first step was to create a new database, and populate it with the data from the existing one. The easiest way is to use the portal to create the new database, and specify a backup source, which should list your existing database. Once you click  ‘Create’, Azure will do the hard work to import all the data, users and schema information for you.

Step 1. Select source backup.

Add_database

Step 2.
The next bit is to recreate the logins using the same SID’s on the new server. This is important as row level security uses the SID to determine which user owns which data. To help in doing this, I wrote a small Sql script that needs to be run on the source database. It prints a Sql statement that creates the logins, and maps the logins to the users in the new database.


declare @sid varchar(200)
declare @name varchar(200)
declare @sql varchar(4000)
set @sql = ''

DECLARE my_cursor CURSOR FOR
select name, dbo.fn_varbintohexstr(sid) from sys.sql_logins
OPEN my_cursor
FETCH NEXT FROM my_cursor INTO @name, @sid
WHILE (@@fetch_status <> -1)
BEGIN

set @sql = @sql + 'CREATE LOGIN '+ @name +' WITH PASSWORD = '''', SID = ' + @sid + CHAR(13)+CHAR(10)
set @sql = @sql + 'ALTER USER '+ @name +' WITH LOGIN = ' + @name +CHAR(10)
FETCH NEXT FROM my_cursor INTO @name, @sid
END

CLOSE my_cursor
DEALLOCATE my_cursor

print @sql

Step 3.

Copy the output of the previous step, log into the new server as admin, connect to the new database, and run the generated script. The script will create logins on the new server, and then link the login to the user. They key ingredient is to create the login with the correct SID. For this scenario, the password is not important, but if you need to also get the password from the old server, you will need to modify the script to create a login with a given password hash.

Step 4.
Publish the application.
With the hard work done, the last step is to just publish the code. To do this, you can download the publish settings of your application from the portal, import them into Visual Studio, and publish.

Final Thoughts

This solution at this stage was a bit of a quick hack – the next obvious step is to wrap this all into a nice package for easy re-usability. With this process, we are now able to take a snapshot of the current state of our solution, and replicate the entire environment, including data and security, in a little over 30 minutes. While this solution was implemented and tested on Azure, the same process should work in SQL Server 2016.

Organizing Visual Studio Projects

5 tips for structuring Visual Studio solutions

If you’re starting a new project, with a new team of developers, it can be hard to know where to start. There’s a frightening amount of decisions to be made at the beginning, and it’s easy to get caught up in circular discussions (which, like circular references, only with humans, go round and around and achieve little).

One thing to decide early on is a standard project structure, which will depend largely on the type of applications you are writing. If you have a mix of applications, like MVC web sites, desktop and mobile apps, you will probably have different folder structures for each type of application. In general, though, there are some basic guidelines that you can follow to make sure your project remains manageable and well-structured.

  1. Keep your naming conventions consistent.

    It’s a good idea to create sub folders for the different layers within a project, usually to separate domain models, infrastructure, helper classes and business logic. Whatever names you choose for those folders, keep them consistent between different projects. This helps navigating a complex solutions folder structure immensely.

  2. Minimize the number of sub folders in your solution.

    Using a deeply nested folder structure might seem like good organization, but unfortunately, Visual Studio and various command line utilities don’t handle deep nested folder structures very well, and have maximum lengths for paths and file names. You need to find a balance, probably no more than three folders deep, and restrict the names of folders to no more than 10-15 characters.

  3. Use virtual solution folders to group projects into domains.

    It’s a good idea to separate a large solution into groups of projects split along domain boundaries. For example, you might have a solution containing 20 or more projects, or many more if implementing something like a micro-services architecture. To help understand the overall solution structure, it’s useful to create solution folders (right-click the solution, choose Add->Solution Folder)  along these boundaries. For example, you might split the solution into 3 areas e.g. Core, Services and Integration. Within each area, there could be multiple projects implementing different services, or integrating with different 3rd parties. Solution folders are not physical disk folders, and therefore are much easier to manage, rename or move around without affecting project dependencies and assembly search paths.

  4. Use the same name for the project and it’s physical folder.

    Although it’s sometimes tempting to create the folders on disk first, and create projects within those folders, Visual Studio and some source control systems are not particularly good at handling this scenario. rather than fighting the default behavior, it’s much less trouble to just go with the flow on this one.

  5. Avoid moving projects around into sub folders.

    Once a project has been created, try to avoid moving the project around on disk, as this causes issues when finding assembly references, and can cause hard to diagnose errors in builds and/or deployments. If you decide to move a project from one folder to another, make you sure manually check the *.csproj files of the project being moved, and any dependent projects, to make sure all references and hint paths are still valid. In particular, look for <HintPath> and $(SolutionDir) references in the project files, and make sure the files being referenced can still be found in the specified location.


Visual Studio 2015 Continuous Integration Tools: Visual Studio Online vs TeamCity

I’ve been reviewing options for a new build controller that supports continuous integration in a Visual Studio 2015 development environment over the last few weeks, and now it’s time to wrap up and compare the two options I tested.

The two tools that I was able to successfully implement were Visual Studio Online and TeamCity 9.1.

Both solutions had their strong and weak points, and which you might choose will depend heavily on your precise needs and development environment.

Why Continuous Integration?

First, let’s examine why you would need a build server and CI in the first place.

Failing early

This is a really important factor when doing agile development. If you have a complex application, it’s inevitable that things will break from time to time. The earlier you know about it, the less effort it will take to fix.

Integration Testing

If your app is hosted in the cloud, you will want to test it in the real world. doing this manually is error prone and time consuming.

Automated deployment

Same as above – deploying complex applications is error prone and time consuming. CI will automate this process

Code Coverage

You can run code coverage tools as part of your build, to make sure that any new code has an associated Unit Test.

Standard Workflow

CI tools can automate more than just the build – once the build is done and tested, the staging server can be backed up, and the new build deployed automatically.

Environment

For the purpose of this comparison, the solution being developed was a web application containing multiple projects, each of which is hosted in it’s own Azure Web App or Web Job. The solution is implemented in Visual Studio 2015, though the front end is a Single Page Application developed in pure HTML/JavaScript.

Setting up the build server

In terms of ease of use, both TeamCity and VSO were very easy to set up and configure, and worked out of the box with Visual Studio 2015. VSO has the edge here, though, as TeamCity requires a dedicated server, whereas VSO is a cloud solution. Another plus for VSO is that it has source control covered, so if you are really starting from scratch, VSO can be a complete solution that works out of the box. With TeamCity, you will need to set up your source control separately, though it supports a wide range of source control systems, and even more with plugins. If you have an existing source control server hosted internally, there’s every chance you can set up TeamCity to use it, whereas with VSO, you will probably end up using VSO’s source control for some part of the process. Git and TFVC are supported in VSO.

Security

VSO uses Microsoft Live accounts and/or Azure subscriptions to manage access to the entire Azure platform, including VSO, Azure hosting and source control. This integrated security can further be managed by syncing with Active Directory. This is a fantastic solution if you are already in an environment where each developer has a windows account and an MSDN subscription.

In contrast, TeamCity has individual user accounts, roles and groups that are specific to TeamCity. This means that managing users in TeamCity becomes an additional administrative task if (when) your team changes.

VSO also has better tools and support for larger development teams, given it’s integrated with the entire Microsoft ecosystem. The downside to VSO is that your source code will be stored on Microsoft’s servers, which can be a security issue in itself.

TeamCity is therefore the better solution if you don’t feel comfortable putting your source code in the cloud.

Features

Both build servers support a huge set of common features related to managing builds, testing and deployment. If your builds are fairly standard, either solution will handle it well. You can set up build steps to call command line tools, manage Nuget packages, run unit tests, deploy to a web server and much, much more.

VSO includes support for a lot more environments, such as Android, iOS and, of course, extremely easy integration with Azure WebApps.

TeamCity can also support the same features, but a lot more work would be required to set up the necessary build agents.

If your needs are those of a typical web application developer, there are enough tools in each solution to handle all your needs. More complex applications are supported by both tools, but will require additional work.

One distinct advantage of VSO is that it comes fully integrated with a suite of tools to support very comprehensive development lifecycle management. This includes source control, defect tracking, QA processes, and project management. TeamCity, in contrast, does one thing very well, and has the advantage if you already have existing processes in place, and just want to add CI.

Usability

There’s not much between the two solutions here. Each one comes with it’s own quirks and perks. Neither product was difficult to use, but I did find that sometimes I spent far too much time looking for a particular option in VSO, mostly because VSO is a much more complex and comprehensive product. In contrast, setting up a project, monitoring builds and viewing statistics and results was dead simple in TeamCity.

It must be said that VSO looks a lot more modern and most of the features have a wow-factor compared to similar tools from other vendors. The Microsoft engineers and designers have done an excellent job to put together such a complex and usable piece of software.

Performance

TeamCity has to get the trophy here, as VSO can be a bit sluggish – both in terms of User Interface, and also the process of initiating a build. Most of this is due to the fact that TeamCity is hosted on the local network, and runs on a pretty decent dedicated server, but the reality is that you are unlikely to match the performance of a locally hosted tool with something that is hosted in the cloud.

Price

Often this is what the choice comes down to. In this case, again, it can be a little confusing in the case of VSO, as price depends on how invested you already are in Microsoft’s products. If you are a MSDN subscriber, you already have a reasonable amount of monthly credit to use Azure services, which includes the cost of making a build in VSO. There are no upfront cost, and instead you are paying for a subscription to a service, so costs will depend on how much you use it.

Overall, considering you don’t need to buy and maintain server infrastructure, the price is quite reasonable, and Microsoft are trying hard to make their own tools as attractive as possible.

Pricing for TeamCity is a lot more like a traditional piece of software. There are 2 versions available: Professional and Enterprise, and the good news is that Professional is completely free.

This version is sufficient for the needs of a small team of developers.

Additional projects and build agents can be added for around $300 each, and the Enterprise version at $1999 removes all restrictions on the number of projects and build agents. However, you will need to include the cost of hosting TeamCity and source control on your own servers, including patching, electricity, maintenance etc. There’s also an overhead for making sure that all the pieces work together, which is not the case in VSO.

Conclusion

It’s difficult to recommend one solution over another – they are both excellent. If you have an existing infrastructure, including servers, source control and a defect tracking system, and you want to continue using these,then TeamCity is probably going to integrate better into your existing infrastructure. On the other hand, if you have none of these things, and want to get up and running quickly, then VSO is going to start looking pretty good.

The only other thing of note is that VSO, being cloud based, will require a decent internet connection. Mostly, this is no longer an issue these days, but if you prefer the assurance that all the parts of your build and deployment process are hosted in-house, then you won’t be disappointed with the features in TeamCity.

Consolidating Package Versions with Visual Studio 2015 Nuget Package Manager

With Visual Studio 2015, there comes version 3 of the Nuget Package Manager .

One of the nice features in it is the ability to consolidate multiple projects to use the same version of a package.

Previously, in a solution that contained multiple related projects, and multiple developers, it was sometimes difficult to ensure that all projects were sharing the same packages. The way to manage this was  (and still can be) to create a powershell script that installs the correct package versions for each project, or to manually install and uninstall packages for each project.

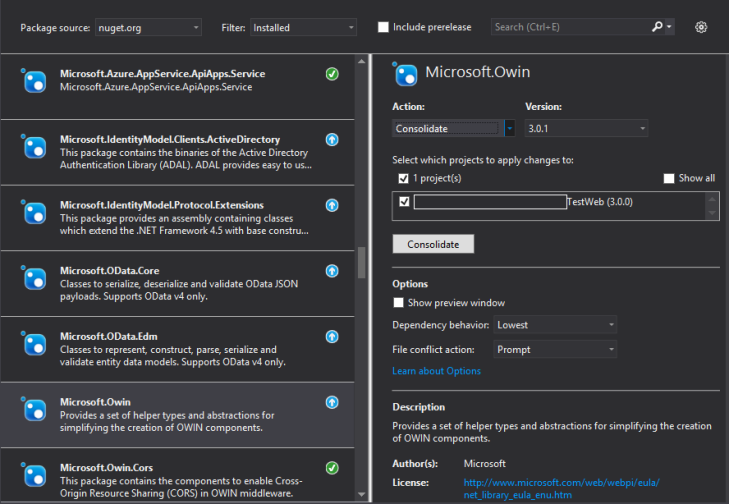
With Nuget Package manager 3.0, there is now a much easier way to maintain the list of packages for a solution. The screenshot below shows the new layout, and the key new feature – the ‘Consolidate’ action.

NPM

Using this action, you can quickly update all the projects in your solution to the same version of a package.

To do this, just right-click on the solution and choose “Manage NuGet Packages for Solution”.

From there, select a package that is installed into multiple projects, and check if the ‘Consolidate’ action is available. If it is, it means that one or more of the projects is using a different version of the package than the selected version. Choosing this action will then display the projects using different versions, as well as the actual version of the package that they are using.

To finish the process, just click the ‘Consolidate’ button.

Repeat this process for every package in the solution, and the mismatched versions are gone.

Automate package management with the package manager console

[UPDATE – 12-Dec-2015]

In case you are not yet using NuGet version 3.3, install it! Consolidation of packages in now a lot easier using the GUI, as there’s a new ‘Consolidate’ button that lists all the packages in the solution that can be consolidated. This is a lot faster than going through one by one.

When you have a large number of projects and packages, it can be much quicker to perform package management functions using the console instead of the user interface. The nuget package manager reference can be found on this page, and I have a listed a few useful commands that I find myself using.

  1. List all packages that have updates available
    get-package -update
  2. Update all packages to the same highest minor version
    foreach ($package in get-package -update) { update-package -Id $package.id -ProjectName $package.projectname -ToHighestMinor -FileConflictAction Overwrite -whatif }
  3. Sync packages in solution to  the same version as the nominated project (Nuget v3 or higher)
    Sync-Package -Id <ProjectName> -WhatIf

The commands that actually make changes to packages.config all have a “-WhatIf” parameter that will show what changes are going to be made without actually making them. It’s important to do the what-if, because running a script on your whole solution can delete or put incorrect references into the packages.config, which may then need to be fixed manually. It’s also wise to use your source control or backup your solution when making changes that potentially affect a large number of files.

Business Software Gamification Part 2 – Patterns

To start seeing some common ways that gamification can be introduced into the design of an application, you might first ask ‘Why ‘gamify’ business software at all?’.

Here are three reasons why you could consider using features and patterns normally found in games when designing your next business application.

Motivate users to complete tasks

The most common, and perhaps easiest to implement pattern is the points / rewards system. This pattern is at the core of most game systems, and is a powerful motivation mechanism.

Being cynical, there is a fine line between performance monitoring and a motivational points system. A lot depends on the metrics used, and the way the information is presented and used. It’s easy to implement something that might be resented by users, if not careful. The rule here is that the points system should be for fun – no one needs to be sacked for failing to meet their targets.

A successful system can be as simple as using identifying badges in user profiles which are awarded when certain conditions are met. The typical conditions might include things like sales value, number of records processed, time logged in, or almost anything that can be measured within the application. Badges and achievements should be designed so that they convey a users experience level, as well as provide some amusement value.

Many sales tracking and CRM applications already have built in a system to measure various business-related metrics, making this pattern by far the most commonly used in non-gaming applications. Shifting the focus from ‘top-down’ management imposed metrics to something a little more fun can be a big motivator.

Increase engagement

Complex applications often end up with many underutilised features, and introducing new features is often a struggle, as business software users are usually less engaged and less keen to discover new features than gamers.

Many applications try to increase engagement, by displaying a ‘Tips’ window either at startup or through a help system – these are even more underutilised than the features themselves. The main reason for this is that they require the user to switch context between the task that they wanted to complete, and learning about a new, probably unrelated feature.

Role Playing Games (RPG’s) use a quest or mission system that increases engagement and promotes discovery. This pattern can easily be adapted to business software.

Going back to the scenario described in the previous post, for a moment, imagine if the developer had not just pulled out all the advanced features, but simply hidden them behind an optional quest system.

This method can then be used to introduce features in a way that can be easily assimilated by the user, where the user always feels in control and not overwhelmed.

The key elements of a quest system are that:

1) Quests must not interrupt the users current task.

2) Quests must be optional.

3) The quest must encourage the user to complete a task in a new  or unfamiliar part of the application.

4) The quest ends in a reward.

For example, on rolling out a new feature, it is initially hidden, and cannot be accessed from the regular user interface. The user then has a 10% random chance to receive a notification, either when using a related feature, or when logging into the application.

This notification must not force the user to change what they are doing right there and then, and therefore should be displayed in an unobtrusive, non-modal area set aside for notifications.

When the user has time, and chooses to investigate the notification, they are given the option to ‘unlock’ the new feature in the menu or navigation system. At the same time, the user is given the details of the quest, that is, the steps required to complete the task, and the details of the reward – e.g. points, an achievement or a profile badge. This information should also describe in detail what the new feature does, and how to use it. If the user chooses to accept the quest, they are taken to the screen, and guided through the task. Each completed quest is tracked by the application, and completing multiple quests will reward the user with points or badges.

Increase collaboration

Sufficiently advanced applications all seem to end up with some kind of ad hoc messaging application built in, usually either email or chat. The driver behind this is that users want to collaborate. While this is often seen as a useful feature, it’s usually poorly implemented and under utilised.

Game design can come to the rescue here again. Like the other points above, there is no single pattern for how games allow gamers to collaborate, however, most games implement one or more of the following:

  • Guilds working toward a common goal – simply replace ‘guild’ with ‘department’ or ‘sales team’
  • Online discussion/self-help forums for users
  • Friends lists with chat and activity feeds

Business Software Gamification Part 1 – Introduction

I’ve been writing about the gamification of software for over a decade on various blogs, forums and newsgroups. In this time I have seen a massive uptake of the principles of game development in the learning/education industry, with many online learning providers now doing some kind of rewards/points system to motivate users. Any time you see points, achievements or levels on a professional development or education web site, you are seeing gamification at work.

Gamfication is defined as ‘the application of typical elements of game playing (e.g. point scoring, competition with others, rules of play) to other areas of activity’.

Recently, in one of the projects I’m working on, a situation arose where we needed to remove features from the product due to the amount of complexity these feature introduced. This resulted in a ‘lite’ version of the software, with many features disabled.

After making these changes, I considered why it was that the features we added (which were all asked for) needed to be removed.

The following scenario is how I think the situation arose.

Imagine you are providing word processing application for an experienced typist, who has never seen a word processor, and who has always done their work on a manual type writer.

You replace their typewriter with a a PC running an application that was heavily inspired by Word 2013. Never having seen a computer, or a word processor, they are immediately confused and intimidated by the number of features available. Buttons labelled ‘Insert Table’, ‘Format’, ‘Revisions’ and ‘Mail Merge’ are just far beyond where this particular user’s comfort zone ends.

‘I just want to be be able to type up letters, change some words to bold, or underline them, and print my work.” they exclaim. You can see where they are coming from, since you do all your word processing in notepad.

So you spend some time removing all the features you added to make your word processor ‘cutting edge’. ‘Insert Table’ – gone. ‘Styles’ – gone. ‘Insert Image’ – gone. What you end up with is a glorified notepad application – you feel a little disappointed removing all those features you worked hard for, but at the end of the day – it’s the user that matters.

Fast forward 2 weeks.

Your user comes up to you and says – ‘You know, I really like this new version of the word processor you developed. There’s one problem though. I’m a bit tired of using under-scores and dashes to display tabular data. It’s a nightmare if you need to add a column or another row. What I’d really like is to be able to automatically insert a table with specified number of rows and columns, so I can just focus on entering the data, and not having to re-format my document  all the time. It would also be really cool if I could just add columns and rows as needed’.

‘What??’ you exclaim. ‘I just removed that feature 2 weeks ago!’.

‘Well, add it back, please.’ you hear.

If this scenario sounds familiar, you know that users are not able to accept rapid changes to their way of working.

I’ve been a proponent of the gamification of business software for a long time, and I think the time is right for software developers to look at the the principles and elements of game software to improve the usability and engagement of business applications by applying the principles that make games, and more recently, learning software, more engaging, interesting, and user-friendly.

Visual Studio 2015 released, Azure MSDN credit increased and new pricing for VM instances

It’s been a busy couple of weeks since the last post.

First up, we were pleasantly surprised that Visual Studio Pro edition with MSDN now gives you $70 in monthly credits. At the same time, the pricing of VM’s was decreased. What this mean is that I can hopefully keep a small VM up and running for more than half the month without running out of credit.

Oh! And Visual Studio 2015 has been released! Aside from a few small issues, existing projects in VS 2013 should work just fine in VS 2015.

The only issues we encountered were related to installation and the Nuget package manager GUI. The latter issue was addressed in a hotfix, and has now been patched properly in an update. For information about the issue, follow this link: https://connect.microsoft.com/VisualStudio/feedback/details/1572078/nuget-crash-in-visual-studio-2015-enterprise

A separate, much more serious issue was found in .NET 4.6, which can result in variables having incorrect values due to an optimization bug in the new .NET compiler (RyuJit). A detailed synopsis of the issue is documented here:

http://blogs.msdn.com/b/dotnet/archive/2015/07/28/ryujit-bug-advisory-in-the-net-framework-4-6.aspx

Overall, the release brings heaps of new features, better support for modern web development, and cross platform support, features I’ll be keen on trying out in the coming weeks.

Building it in the Cloud – Part 3

Introduction

Now that we have a web app in azure, and have connected it to Visual Studio Online in the earlier posts (part 1 and part 2), it’s time to finish up this little project by checking out how the build and deployment pipeline works.

 Continuous Integration

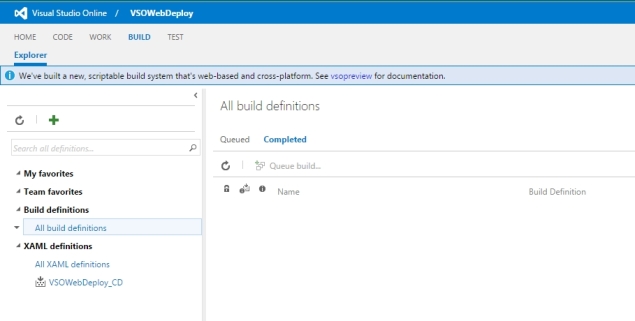
Log into the Visual Studio Online account linked to you Azure subscription, and go to to our project, which should be available from the dashboard. Once you click on the project name, go to the ‘BUILD’ tab.

Build1

You can see the build definition created for you when the web app was linked to Visual Studio Online. You can also go to the ‘CODE’ tab to confirm that all your project files have been committed to Visual Studio Online’s Git repository.

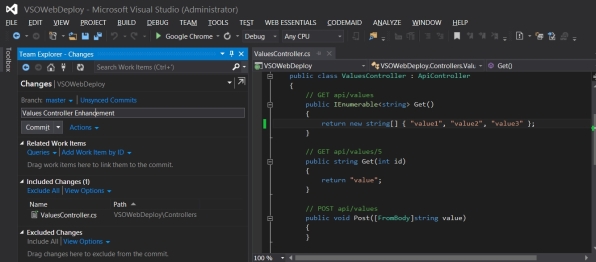
Once that’s confirmed, we need to test the integration with our development environment. For that, let’s go back to Visual Studio 2013, open the project, and make a change. I’ve added an extra value to the Values Controller class.

build2

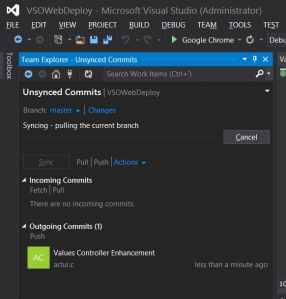
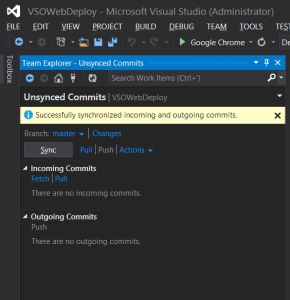
Now we need to commit our changes to the local repository, and sync to Visual Studio Online.

build3build4

If everything worked correctly, we should shortly see our changes on the production site, and our source code in Visual Studio Online. Let’s log back into Visual Studio Online, and check to see what has occurred after committing our changes.

build5

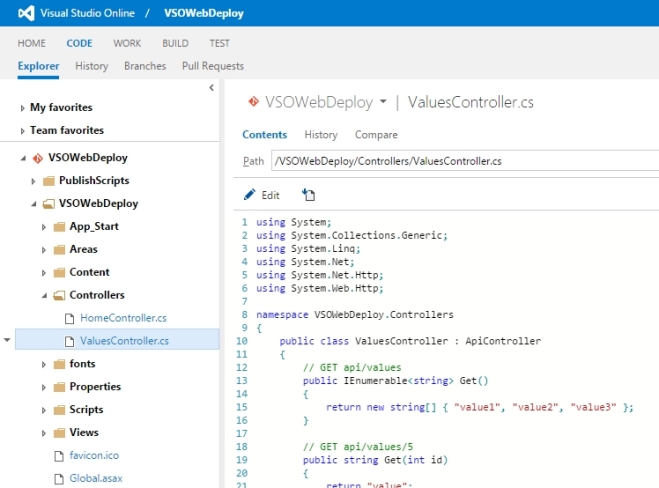
First, in the ‘CODE’ tab, we can see that our changes were synced to the remote repository – the “value3” change is visible in the code explorer view.

build7

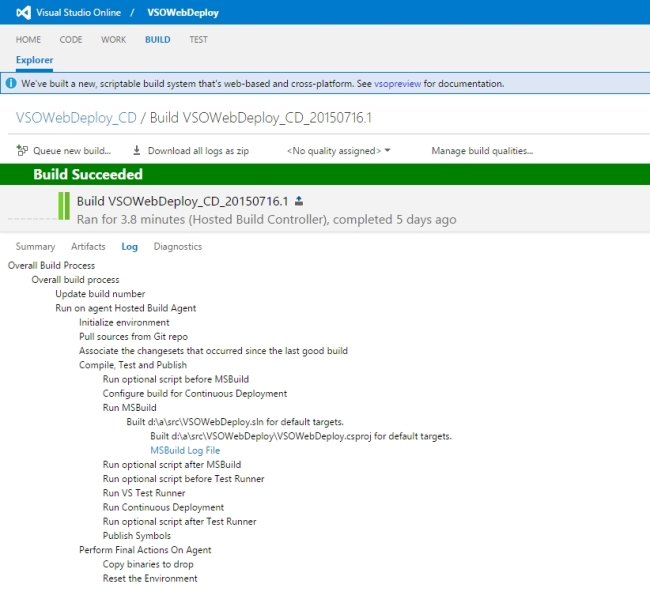
Next, let’s check the ‘BUILD’ tab. Sure enough, there’s a new build there created a minute ago – it has a green tick, so the code was successfully compiled on the hosted build server.

Great, just a couple more things – let’s check the build logs, by right-clicking the build, and selecting ‘Open’.

build9

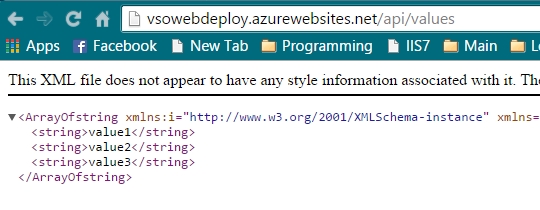
And finally, we need to open our web site, go to the values API, and confirm that the changes are successfully deployed to production.

build10

 Conclusion

This series of articles has barely scratched the surface of the capabilities in Visual Studio Online. The next step is to schedule automated tests, set up deployment slots, and customize the build process.

However, I hope this brief look at Visual Studio Online’s features is enough to encourage you to look further.